I was so confirtable in my chair, with tales of zestiria in 4k from my steam machine.... Well... Give me a second.. And a side note, can i get access to the wiki? I can manage it and the support forum ;)
[doublepost=1450732668,1450726578][/doublepost]
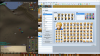
generator with all male and female merged together
Download, inspec how the filenames are done and you should be good replecating it.
backup your generator dir before copying ;)
[doublepost=1450733384][/doublepost]lets say you have a file you downloaded called
located in downloaded parts folder/variation/male ---> icon_Ears_p03
located in downloaded parts folder/face/male ---------> FG_Ears_p03_c1_m001
in your generator folder
you have many similar named files in a numbered sequency.. the last one being
located in RPGMV/Generator/variation/male ---> icon_Ears_p17
located in RPGMV/Generatorl/face/male ---------> FG_Ears_p17_c1_m001
you will have to go back to your downloaded files
located in downloaded parts folder/variation/male ---> icon_Ears_p03 <----- rename this to the last number of the file you alreaddy have in the same folder (of your generator) + 1
located in RPGMV/Generator/variation/male ---> icon_Ears_p18 (p17+1 = )
located in downloaded parts folder/face/male ---------> FG_Ears_p03_c1_m001<----- rename this to the last number of the file you alreaddy have in the same folder (of your generator) + 1
located in RPGMV/Generator/face/male ---------> FG_Ears_p18_c1_m001 (p17+1 = )
sorry for the messy explanation..
you must follow sequence. if you try renaming to p301 (and there are no files in between ... it will not work.)
[doublepost=1450733509][/doublepost]///////////////////////////////////////////
File Locations:
Windows Default Steam Root: SteamApps/common/RPG Maker MV/
Windows Default Root: Program Files (x86)/KADOKAWA/RPGMV/
Mac Default Steam Root: ~/Library/Application Support/Steam/SteamApps/common/RPG Maker MV/
Mac Default Root: ~/Library/Application Support/RPG Maker MV/
(THIS IS A GUESS AND MAY NOT BE ACCURATE)
Mac OS X users, you may have to use Command + Shift + G from Finder to open a Go To Folder Dialog to get to that location.
All of these have a specific layered order to them I hope to unravel what those layers are in order in a bit:
FG_[ITEM_SELECTION]#_[p##]_[c#]_[m###].png
[ITEM_SELECTION] - this is related to the side menu options in the Generator
[p##] - this is related to the position in the selector. Don't use p00 for anything as that is normally the black option though not all options have that, ears for example to not
[c#] - I believe this allows us to have multiple parts to graphics that are assembled by the generator with the lowest number in front of the higher numbers.
[m###] - This relates to the colored layer that you can select if this is not present, the color selections will be grayed out and you will not be able to change the color in the Color selector. I believe that each section is looking for a specific m### for the file name to make it something that can be filtered quickly for a specific section of the character for the options. To test this, I added _m005 to the FG_FacialMark_p02_c1.png file. The next time I booted up the generator, I was able to select colors on the Selector and watch them change the bandage color on the face graphic. I had not changed the other files to include the change and there are no file name changes that need to be implemented for that to happen. Instead, the _c.png file that exists is a mask that is applied and allows colors to be changed. There is an RGB value that is used to make the color match what needs to be changed. and the entire section that you want to be colored needs to match that. I will be working to include the RGB values of each m### as well. For the Face Folder, to have multiple colors show up there, the color options need to exist. This is seen with the default graphics on Male Rear Hair 6 that has the Hair tie. The Tie is color 2 and has the same name up until the _c#_ and increments from 1 to 2, so it's color option 2 and the m### for that option is m004 or Hair Sub Color. For the actual files, that is all managed in the 1 file ending in _c as it provides the coloration layer.
m001 = Skin Color- R:249, G:193 , B:157
m002 = Eye Color- R:44, G:128, B:203
m003 = Hair Color - R:252 , G:203, B:10
m004 = Hair Sub Color - R:184, G:146 , B:197
m005 = Facial Mark Color - R:0, G:145, B:150
m006 = Beast Ears Color - R:211 , G:206 , B:199
m007 = Clothing Main Color - R:174, G:134, B:130
m008 = Clothing Sub Color 1 - R:254, G:157, B:30
m009 = Clothing Sub Color 2 - R:28, G:118, B:208
m010 = Clothing Sub Color 3 - R:217, G:164, B:4
m011 = Cloak Main Color - R:216, G:172, B:0
m012 = ??? THIS IS A GUESS. There are no current items that make use of this m### o_O ??? - Cloak Sub Color- R:???, G:???, B:???
m013 = Accessory 1 Main Color - R:211, G:206, B:194
m014 = Accessory 1 Sub Color 2 - R:218, G:52, B:110
m015 = Accessory 1 Sub Color 2 - R:164, G:201, B:17
m016 = Accessory 2 Main Color - R:199, G:132, B:7
m017 = Accessory 2 Sub Color 1 - R:192, G:211, B:210
m018 = Accessory 2 Sub Color 2 - R:65, G:85, B:182
m019 = Accessory 2 Sub Color 3 - R:186, G:59, B:69
m020 = Glasses Main Color - R:153, G:153, B:153
m021 = Glasses Sub Color 1 - R:204, G:186, B:210
m022 = Glasses Sub Color 2 - R:96, G:126, B:75
Wings - R:167, G:214, B:214
Tail - R:230, G:214, B:189
TAIL? O_O no m layer for tail color or for wings (Thanks
MutationIvori for finding and pointing this out)? Curious
Working with the Gradient Colors
Contribution in whole by Binjovi Me - "It
may be IS possible to add more colors to the palette, Binjovi did some digging and turned up these results! THANKS BINJOVI!!!"
Binjovi, on 05 Nov 2015 - 9:10 PM, said:

I did some toying around with the gradients file last night. I couldn't do anything to the file itself to increase or decrease the number of color options available in the program. In fact, the same number of color options are present even when the file doesn't exist in the appropriate folder, but load up as all black. It seems probable that the number of colors are hard-coded into the program itself and cannot be added to.
However, colors can be replaced by different ones. So if there is a specific color or set of colors that you don't use often, you can replace those gradients in the file. Also, because any exported character image files retain the colors they were saved in, it's possible, though slightly more time-consuming, to switch back and forth between multiple gradient files to get the extra colors; provided you only use one file per a character. You can't mix-and-match. Not an ideal situation, but it works.
One thing that I experimented with was adding filters/color washes over the gradient file to make the color options fit a different palette. For instance, by adding a subtle sepia tone filter, the characters I was creating all had that brownish tint to them. They felt like they'd be right at home in a gritty tactical/strategy RPG; or perhaps in some sort of old-timey western or flashback. This file could be used in creating distinct palettes to help games stand apart.
I did also try some funky gradients, like one that resembles a shiny, chrome reflection, inverted gradients, and even one that ran through the colors of the rainbow. Most of those didn't look that great, but experimenting was pretty entertaining just on it's own.
Before I finish, I'll leave this image which breaks up the gradients into the sections MV uses on the different parts. It's not too difficult to figure out, but I figured it'd be a help.
The pure white bar is a bit of an anomoly. I'm not sure what it's purpose is. I thought that it might be the "default color" option, but coloring it in did nothing that I could see. I guess I should also mention that the gradent "bars" are four pixels thick. The top line of pixels are the only ones needed to be changed in order for the color to change on your character. The bottom three, as far as I can tell, are only there to fill in the icon in the program itself.
The File List
Face/Female/FG_AccA - Accessory 1 - 3 Color Max
Face/Female/FG_AccB - Accessory 2 - 4 Color Max
Face/Female/FG_BeastEars - Beast Ears
Face/Female/FG_Body - Character Neck
Face/Female/FG_Cloak# - 1 is Front side, 2 is Back Side
Face/Female/FG_Clothing# - 1 is Front side, 2 is Back Side
Face/Female/FG_Ears - Human Positioned ears
Face/Female/FG_Eyebrows - Eyebrows
Face/Female/FG_Eyes - Eyes
Face/Female/FG_Face - Face Shape
Face/Female/FG_FacialMark - Facial Marks
Face/Female/FG_FrontHair - Front hair of the character
Face/Female/FG_Glasses - Glasses
Face/Female/FG_Mouth - Mouth
Face/Female/FG_Nose - Nose
Face/Female/FG_RearHair - Rear hair of the character
Face/Male/FG_AccA - Accessory 1 - 3 Color Max
Face/Male/FG_AccB - Accessory 2 - 4 Color Max
Face/Male/FG_Beard - Beard
Face/Male/FG_BeastEars - Beast Ears
Face/Male/FG_Body - Character Neck
Face/Male/FG_Cloak# - 1 is Front side, 2 is Back Side
Face/Male/FG_Clothing# - 1 is Front side, 2 is Back Side
Face/Male/FG_Ears - Human Positioned ears
Face/Male/FG_Eyebrows - Eyebrows
Face/Male/FG_Eyes - Eyes
Face/Male/FG_Face - Face Shape
Face/Male/FG_FacialMark - Facial Marks
Face/Male/FG_FrontHair - Front hair of the character
Face/Male/FG_Glasses - Glasses
Face/Male/FG_Mouth - Mouth
Face/Male/FG_Nose - Nose
Face/Male/FG_RearHair - Rear hair of the character
///////////////////////////////////////////