
Hey guys, and welcome to my first tutorial. I hope that you guys can utilise this to help organise database information for your game/s. This is a method that I find easiest, as it allows you to quickly and easily see all of the information that you want, and can be easily changed if you need to do so.
Firstly, you'll want a spread sheeting program, such as Excel. If you don't have access to any, you can use Google Sheets, which is what I will be using and referring to throughout this tutorial. I find Google Sheets very useful, because if you have multiple persons on your team, you can grant them access to make changes, or just share the link so people can view it. In addition, all changes made are instantly saved to Google Drive, so you don't have to worry about losing any information. Google Sheets, however, doesn't have all of the features a program like Excel has, but it has a lot.
The biggest benefit I find with working in a spreadsheet instead of directly in the database is the fact that, aside from being able to easily see all the information, you can print out the information of ease of reference, which makes things much easier when it comes to inputting data.
Now, onto the tutorial. :)
---
You will need to get your spreadsheet laid out with the information you need or want in include in your database. For this tutorial, I've set up a spreadsheet with 6 different tabs (all of which are pretty self-explanitory, but just in case, I'll list what each tab is for here):
CHARACTERS

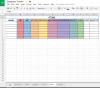
As you can see in the image above, the Characters/Class tab should have the main information that you will need to input into the database. I've listed both levels 1 and 99 in order to make the growth curve easier to generate. Please note that the max level can change with plugins, but for the purposes of this tutorial, we'll go with the maximum numbers available in MV by default.
CLASS - Refers to the Actor's class. For example, Warrior, Rogue, Mage, etc.
HP - This refers to the MAX HP of the class.
MP - This refers to the MAX MP of the class.
ATTACK/DEFENCE/M.ATTACK/M.DEFENCE/AGILITY/LUCK - Refers to the value assigned to each of these stats for the class.
Fairly simple. For ease of reference, I've also color coded the stat columns. This is purely aesthetic and is only used to make searching for stats easier.
SKILLS

The Skills tab lists the skills/abilities/attacks of your characters and enemies. While there is other information that you may need to enter into your database in relation to skills, such as Speed, Damage Type, Damage Element, etc., for the purposes of this tutorial, I'll be using just the basic information.
LEVEL - Refers to the level the character will learn the skill at.
NAME - The name of the skill.
TYPE - The core type of the skill. By default, MV has only 3 core skill types - Magic, Special & None.
MP COST/TP COST - These refer to whether or not the skill has an MP or TP cost.
RANGE - This is used to determine who the skill targets, such as 1 enemy, a random enemy, an ally, etc.
FORMULA - This is where you would write out the damage formula for the skill, if any.
EFFECT - Lists whether or not the skill has any particular effect/s.
Further to both name and effect, I utilise notes in the spread sheet to give flavour text/description for the skill, and to list the effects. You can always add more columns should you wish so you can more easily see the effects that the skill provides.
WEAPONS & ARMOR


I'm combining the Weapons & Armors tabs into one due to the similarities between the two sheets.
Similarly to the characters sheet, developing weapons and armor require you to input stats that each item provides. Additionally, the effects column is added here in order to list any effects an item provides, such as HP Regeneration or State Resistance, for example. Like with the skills sheet, you can always add more columns to list additional effects should you desire to do so. Again, I like to utilise notes to place flavour text or list effects.
ITEMS
Like the other tabs, the stats listed here show the stat boosts a certain item, such as an Accessory, provides. While Accessories are classed as an armor by RM, I like to list them separately to distinguish between the 2. If you prefer, you can add accessories to your armor sheet.
The items sheet is designed to list any items that your game & characters use. If you choose to place accessories in your armor sheet, you can remove the stat columns.
COST - This lists the cost of the item, if it can be bought.
EFFECTS - This lists the effect/s that the item provides.
As a side note, you can always add additional columns to enter information such as whether the item is consumable, or if it is a key item. I tend to simply add them to their own section within the sheet itself.
ENEMIES

Like Characters, the enemies sheet allows you to create and balance your enemies. By default, enemies can only drop up to 3 items, but this can be changed with plugins. Remember that you can add columns if you need or want to, to accommodate any plugin data you use.
PLAYER LEVEL - This refers to the ideal level your characters need to be at in order to effectively combat the enemy. This is very useful when determining enemy stats.
EXP - The amount of experience the enemy will grant the character on defeat.
GOLD - How much gold the enemy drops upon defeat.
ITEM 1/2/3 - What item/s the enemy drops.
RATE - Refers to the drop rate chance that the enemy will drop a particular item.
---
Always remember that you can add or remove columns to your spreadsheet as you see fit. Each project is different, and so each project will need different levels of information.
Hopefully, this tutorial will help you organise your database planning, and make it easier for you to see all the information you need.
Remember, if you have any questions, feel free to comment here or shoot me a PM. I'm always happy to help people out. :)
Firstly, you'll want a spread sheeting program, such as Excel. If you don't have access to any, you can use Google Sheets, which is what I will be using and referring to throughout this tutorial. I find Google Sheets very useful, because if you have multiple persons on your team, you can grant them access to make changes, or just share the link so people can view it. In addition, all changes made are instantly saved to Google Drive, so you don't have to worry about losing any information. Google Sheets, however, doesn't have all of the features a program like Excel has, but it has a lot.
The biggest benefit I find with working in a spreadsheet instead of directly in the database is the fact that, aside from being able to easily see all the information, you can print out the information of ease of reference, which makes things much easier when it comes to inputting data.
Now, onto the tutorial. :)
---
You will need to get your spreadsheet laid out with the information you need or want in include in your database. For this tutorial, I've set up a spreadsheet with 6 different tabs (all of which are pretty self-explanitory, but just in case, I'll list what each tab is for here):
- Characters - Develop your character classes and stats.
- Skills - Develop the skills for your characters.
- Weapons - Develop weapons for your game.
- Armors - Develop armors for your game.
- Items - Design and develop your items.
- Enemies - Create and develop your enemies for balancing.
CHARACTERS
As you can see in the image above, the Characters/Class tab should have the main information that you will need to input into the database. I've listed both levels 1 and 99 in order to make the growth curve easier to generate. Please note that the max level can change with plugins, but for the purposes of this tutorial, we'll go with the maximum numbers available in MV by default.
CLASS - Refers to the Actor's class. For example, Warrior, Rogue, Mage, etc.
HP - This refers to the MAX HP of the class.
MP - This refers to the MAX MP of the class.
ATTACK/DEFENCE/M.ATTACK/M.DEFENCE/AGILITY/LUCK - Refers to the value assigned to each of these stats for the class.
Fairly simple. For ease of reference, I've also color coded the stat columns. This is purely aesthetic and is only used to make searching for stats easier.
SKILLS
The Skills tab lists the skills/abilities/attacks of your characters and enemies. While there is other information that you may need to enter into your database in relation to skills, such as Speed, Damage Type, Damage Element, etc., for the purposes of this tutorial, I'll be using just the basic information.
LEVEL - Refers to the level the character will learn the skill at.
NAME - The name of the skill.
TYPE - The core type of the skill. By default, MV has only 3 core skill types - Magic, Special & None.
MP COST/TP COST - These refer to whether or not the skill has an MP or TP cost.
RANGE - This is used to determine who the skill targets, such as 1 enemy, a random enemy, an ally, etc.
FORMULA - This is where you would write out the damage formula for the skill, if any.
EFFECT - Lists whether or not the skill has any particular effect/s.
Further to both name and effect, I utilise notes in the spread sheet to give flavour text/description for the skill, and to list the effects. You can always add more columns should you wish so you can more easily see the effects that the skill provides.
WEAPONS & ARMOR
I'm combining the Weapons & Armors tabs into one due to the similarities between the two sheets.
Similarly to the characters sheet, developing weapons and armor require you to input stats that each item provides. Additionally, the effects column is added here in order to list any effects an item provides, such as HP Regeneration or State Resistance, for example. Like with the skills sheet, you can always add more columns to list additional effects should you desire to do so. Again, I like to utilise notes to place flavour text or list effects.
ITEMS
Like the other tabs, the stats listed here show the stat boosts a certain item, such as an Accessory, provides. While Accessories are classed as an armor by RM, I like to list them separately to distinguish between the 2. If you prefer, you can add accessories to your armor sheet.
The items sheet is designed to list any items that your game & characters use. If you choose to place accessories in your armor sheet, you can remove the stat columns.
COST - This lists the cost of the item, if it can be bought.
EFFECTS - This lists the effect/s that the item provides.
As a side note, you can always add additional columns to enter information such as whether the item is consumable, or if it is a key item. I tend to simply add them to their own section within the sheet itself.
ENEMIES
Like Characters, the enemies sheet allows you to create and balance your enemies. By default, enemies can only drop up to 3 items, but this can be changed with plugins. Remember that you can add columns if you need or want to, to accommodate any plugin data you use.
PLAYER LEVEL - This refers to the ideal level your characters need to be at in order to effectively combat the enemy. This is very useful when determining enemy stats.
EXP - The amount of experience the enemy will grant the character on defeat.
GOLD - How much gold the enemy drops upon defeat.
ITEM 1/2/3 - What item/s the enemy drops.
RATE - Refers to the drop rate chance that the enemy will drop a particular item.
---
Always remember that you can add or remove columns to your spreadsheet as you see fit. Each project is different, and so each project will need different levels of information.
Hopefully, this tutorial will help you organise your database planning, and make it easier for you to see all the information you need.
Remember, if you have any questions, feel free to comment here or shoot me a PM. I'm always happy to help people out. :)