
MadPumpkin
NPC
- Xy$
- 0.00
Okay, I'm going to start by being blunt and rude. What the F*** is with all of your guys's maps?
I mean I haven't seen a single mapping tutorial yet, and all of the projects I've seen don't look too bad until I get to the screenshots.
I'm not naming names and I'm not singling people out. but I'm here to help with this. So here it is My first mapping tutorial for MV.
Let's start with a Rugged forest to ease into things.
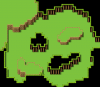
Let's first start by setting the stage with some pretty basic layouts, nothing fancy, nothing complicated, just a few clifftops.
 ~~
~~
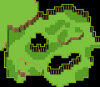
Now we cut in with some tree tops to help ease the view and feel, but again still nothing fancy.
 ~~
~~
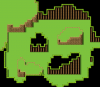
Now we can add the wall faces to our map, to help us build the generic closed feel of the map. don't be afraid to use the square tool for this.
 ~~
~~
there is a large number of problems Made in this Map, and all of it is the walls. I'm not saying I've seen any maps like this recently on this site, but I know there are people that make these mistakes. so I'm saying it out flat! EVEN OUT YOUR WALL BOTTOMS! maps with overstretched walls like this are terrible and kill the whole game. so if your forest is 2 tiles high, make all the walls end at 2 tiles high. aside from maybe a few hills like I have in this mapping tutorial
 ~~
~~
okay, now before we add foliage or make events, we begin with adding spice to our map. if you look at the little inward edges of some of the cliff tiles you'll see they don't shade properly or look right.
Now is when you use the Shift click mapping tool. which I will explain step by step:
first you take your mouse and find a cliff with a face of at least 3 tiles wide by however many tall.
you will right click the middle of the cliff, and drag the mouse from either the bottom or the top of the cliff to the vice versa top or bottom.
now go to an inward edge of the cliff, if it is a face of 1 and is an edge, skip it, if it is a face of one and is in-layed hold shift then click to paste your cliff face.
repeat this with similar locations.
Now, find a cliff face that is sticking out, and repeat the same steps except with the edge tiles. and use them to fix that pesky green corner at your cliff edges.
 ~~
~~
If your map looks like mine, good job, if not I suggest you keep practicing with the shift feature.
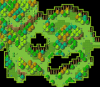
now we can add our grass and trees to the map. at this point all sorts of foliage can make a map look nice if used right. start with the grass on tile A, then add your trees, I suggest grabbing my tree recolors, but that is up to you entirely.
Add the Grass
 ~~
~~
Add some trees, don't be afraid to mix them up if you have my recolors.
 ~~
~~
Then add the rest of the foliage, now is when you also look at what features don't fit in your map and remove them if you need to.
 ~~
~~
tada a wonderful (maybe) map!
I mean I haven't seen a single mapping tutorial yet, and all of the projects I've seen don't look too bad until I get to the screenshots.
I'm not naming names and I'm not singling people out. but I'm here to help with this. So here it is My first mapping tutorial for MV.
Let's start with a Rugged forest to ease into things.
Let's first start by setting the stage with some pretty basic layouts, nothing fancy, nothing complicated, just a few clifftops.
~~ Now we cut in with some tree tops to help ease the view and feel, but again still nothing fancy.
~~ Now we can add the wall faces to our map, to help us build the generic closed feel of the map. don't be afraid to use the square tool for this.
~~ there is a large number of problems Made in this Map, and all of it is the walls. I'm not saying I've seen any maps like this recently on this site, but I know there are people that make these mistakes. so I'm saying it out flat! EVEN OUT YOUR WALL BOTTOMS! maps with overstretched walls like this are terrible and kill the whole game. so if your forest is 2 tiles high, make all the walls end at 2 tiles high. aside from maybe a few hills like I have in this mapping tutorial
~~ okay, now before we add foliage or make events, we begin with adding spice to our map. if you look at the little inward edges of some of the cliff tiles you'll see they don't shade properly or look right.
Now is when you use the Shift click mapping tool. which I will explain step by step:
first you take your mouse and find a cliff with a face of at least 3 tiles wide by however many tall.
you will right click the middle of the cliff, and drag the mouse from either the bottom or the top of the cliff to the vice versa top or bottom.
now go to an inward edge of the cliff, if it is a face of 1 and is an edge, skip it, if it is a face of one and is in-layed hold shift then click to paste your cliff face.
repeat this with similar locations.
Now, find a cliff face that is sticking out, and repeat the same steps except with the edge tiles. and use them to fix that pesky green corner at your cliff edges.
~~If your map looks like mine, good job, if not I suggest you keep practicing with the shift feature.
now we can add our grass and trees to the map. at this point all sorts of foliage can make a map look nice if used right. start with the grass on tile A, then add your trees, I suggest grabbing my tree recolors, but that is up to you entirely.
Add the Grass
~~ Add some trees, don't be afraid to mix them up if you have my recolors.
~~Then add the rest of the foliage, now is when you also look at what features don't fit in your map and remove them if you need to.
~~tada a wonderful (maybe) map!
